Hello friends,
Recycle bin is a special folder that stores deleted files or folders.A recycle bin is

HOW TO SET YOUR RECYCLE BIN TO ALWAYS DELETE
Click on “Start” icon then go to “Run” and type “Regedit” in the provided box and tap enter.
It will take you to your registry panel, here locate the:
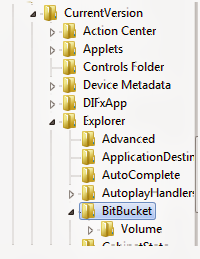
Microsoft\Windows\CurrentVersion
\Explorer\BitBucket.
Here in right side panel, double click on “NukeOnDelete” and set its
value to 1. Now close the registry editor and restart your computer
for the changes to take effect.
That is the simple trick to change your recycle bin to always delete.
You can share your thought with the comment box below.
value to 1. Now close the registry editor and restart your computer
for the changes to take effect.
That is the simple trick to change your recycle bin to always delete.
You can share your thought with the comment box below.

Configuring Your RECYCLE BIN To auto delete

Reviewed by bangsad
Published :
Rating : 4.5
Published :
Rating : 4.5


